Tutorial of the green & yellow flower pin
August 17, 2006 at 9:55 am | Posted in Craft - How-to's | 39 CommentsIt has been almost 1 year since my last picture tutorial. I’m not sure if I have “recorded” all neccessary steps.
Click the pictures for bigger version.
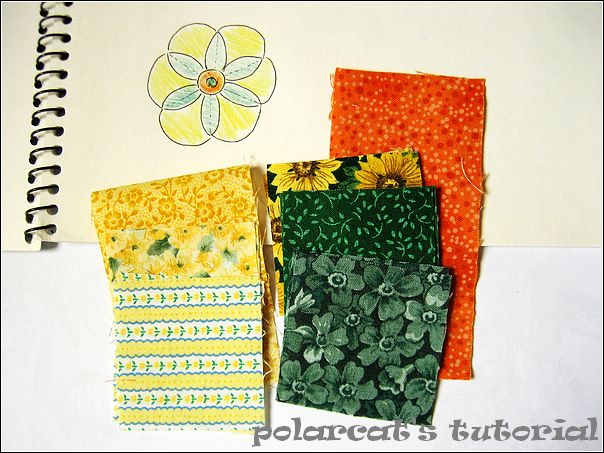
1. Use color pencils & sketchbook to design the color theme. It’s easier to do so with the available fabric scraps around. The petal color is considered as the top. As for my design, the light yellow fabrics would be on the top and the dark green on the bottom.
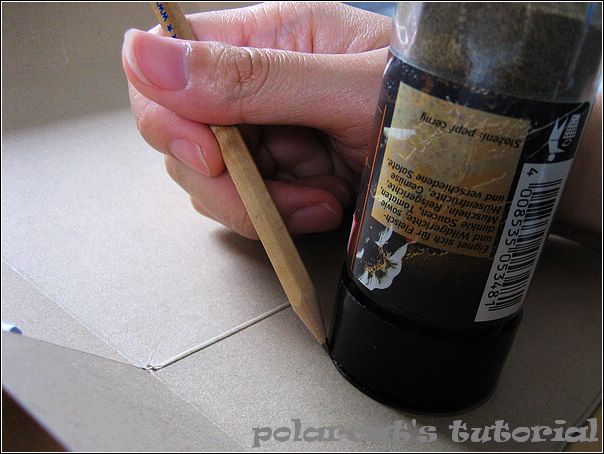
2. Make the template….with my pepper bottle. ^^ It would be better if there is a pair of compasses…or a printer. But I’m lucky enough to find something fit my scraps. Most of my scraps are 2 inch squares. Here is the pattern. Resize as you want.
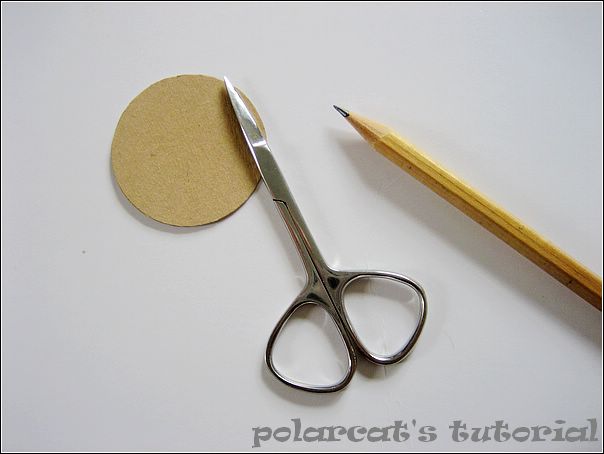
3. Cut the template out. It is possible to draw a circle directly on the fabrics without such a template (but with the bottle), even though I prefer to make one so as to keep a record of this project. That’s why I always keep the paperboard packages of various food. 🙂
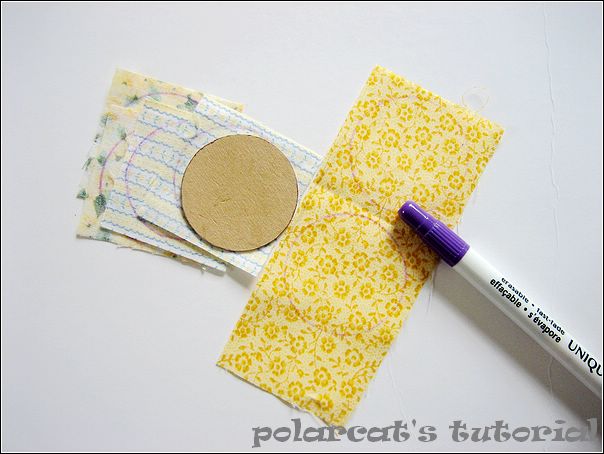
4. Draw the pattern on the scraps. It might be easier to use a “B” pencil. My HB pencil was just too sharp at the moment, hence I use my fast-fade marker. (The circle faded kind of too fast. -.-)
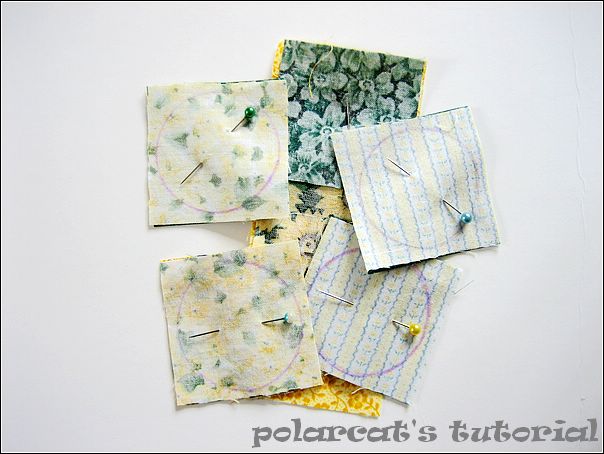
5. Pair the top fabric with the bottom and pin the right sides together. In my project, it’s to pin each yellow scraps with a green one. We need 6 such pairs for one flower pin.
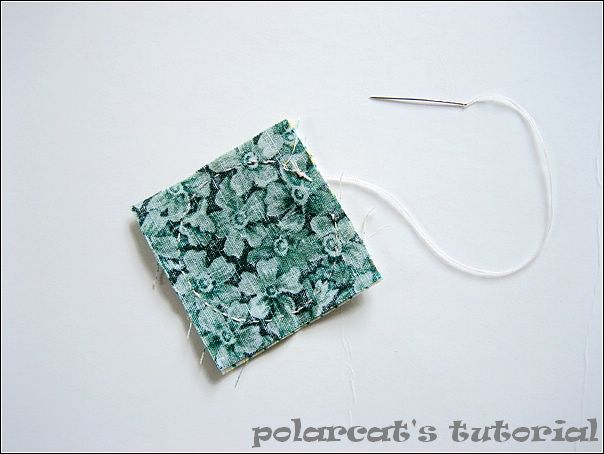
6. Sew each pair together following the circle drew before, but leave a small open of 1-2cm.

7. Trim the piece to a circle. I only keep 2mm “seam allowrance”.(I’m not sure whether it can still be called “seam allowrance” or not if it is made in this way.)
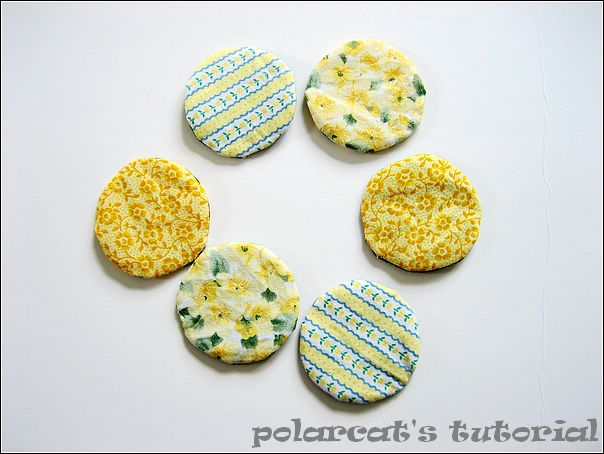
8. Turn the right sides out from the small open left in step 6. Use blind stitches to “close” the open.

9. Mark the sewing guidelines on the “TOP” of each round piece. It was my favorite part of this project to obtain an equilateral triangle inside the cirle with just one ruler. 😀 Anyway, the lines are also in the pattern.
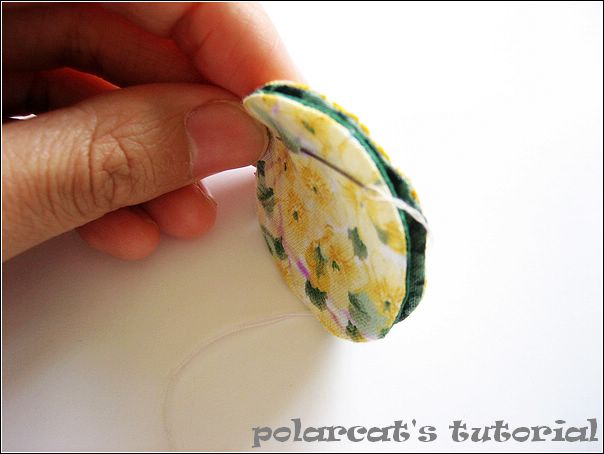
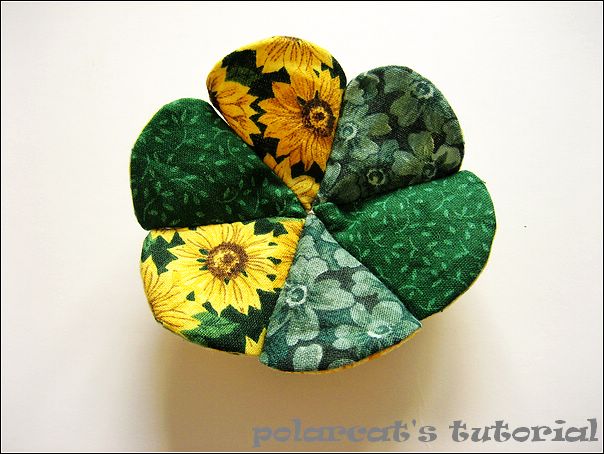
10. Attach each circle with another two following the lines from step 9. Please note, “bottom” is facing “bottom” during this process.
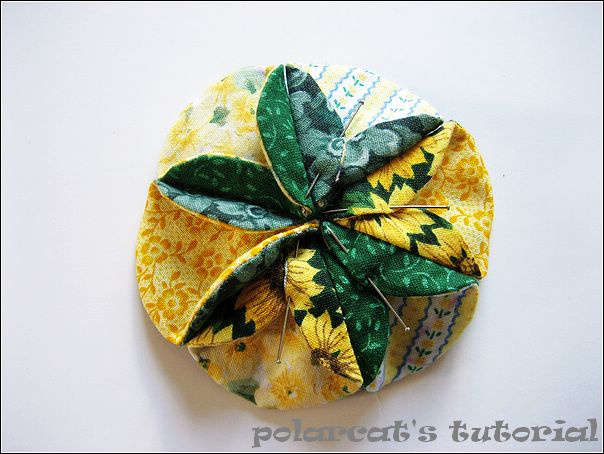
11. That’s how it looks like after all six pieces are sewed together. It’s almost done, and we still need some decorations. ^^
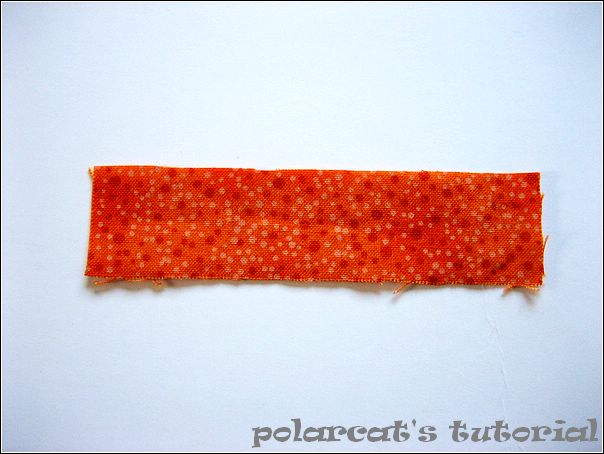
12. Yoyo is quite popular in this situation, however I think making a yoyo is too wasteful. Here I just use a 1-inch wide orange leftover. The length doesn’t really matter.
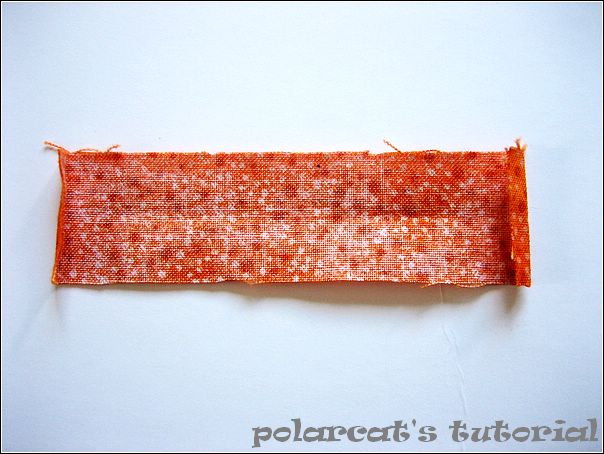
13. Fold each end of the orange tape and fold it into two.
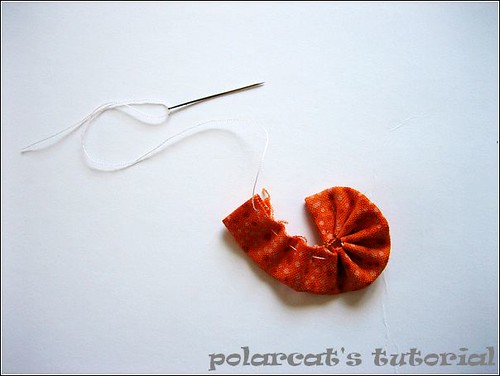
14. Sew the open with running stitch and pull the thread so as to gather this side of the fabric. Ajust it to a circle, exactly like a yoyo. ^^ If you want to make a yoyo, see Heather Bailey’s tutorial.
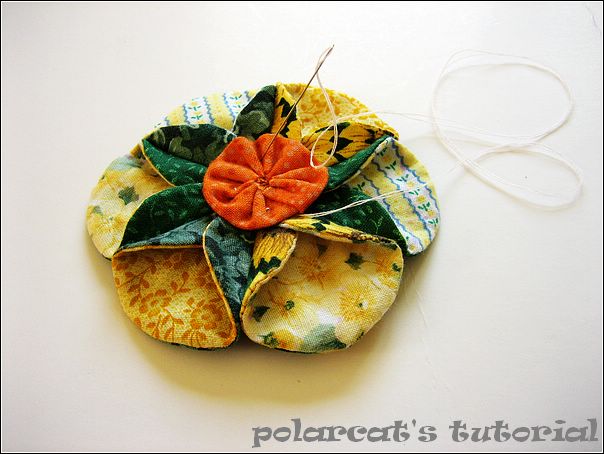
15. Attach the “fake” yoyo to the flower.
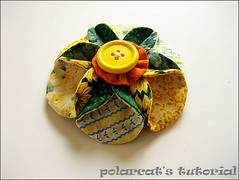
16. The last thing is to add a button over the orange piece and we are done! The back of this flower will be like this:
Don’t hesitate to ask if you have any question.:-)
39 Comments »
RSS feed for comments on this post. TrackBack URI
Leave a comment
 Craft Backyard
Recent Comments
Flickr

Site Meter
Worldmap


Create a free website or blog at WordPress.com.
Entries and comments feeds.

hehe,这几张的手就很漂亮啊,反面看起来也不错, 是不是本来打算同花样的两片相对的
Comment by Anonymous— August 18, 2006 #
lindissimo!!!!!!!!!!parabens.QUE O TODO PODEROSO,O ETERNO.TE ABÇOE MAIS E MAIS.LUCIA
Comment by LÚCIA DE BARROS— November 3, 2009 #
这个排列是随意而成…..^^
Comment by polarcat— August 18, 2006 #
Wow, polar cat! I love it, and I will definitely make one. Thank you for making this tutorial.
Comment by Lisa K.— August 18, 2006 #
This is so clever! I make fabric flowers too, just love the look of them. Yours is so pretty 🙂
Comment by Miriam— January 3, 2007 #
[…] made this tutorial last August when I just started blogging in […]
Pingback by Flower-pin revisited « Crafty Beats— May 23, 2007 #
It’s just a great your tutorial, I’ll give it a try, it’s beautiful. Thanks for sharing and being available for question.
Comment by Yho— May 28, 2007 #
Très joli….. merci pour ce tutorial
Comment by patou— September 11, 2007 #
it is very wonderful!!!Many thanks to you!!!i am from Italy!!
Comment by Diana— September 14, 2007 #
Thank you for your tutorial, It’s very interessant. In an other langage, it’s very easy to undestand. Thank you
Friendly from France
Comment by nathalie L— September 19, 2007 #
[…] Polarcat’s Flower Tutorial […]
Pingback by Embellishing is SEW Creative « THE DOMESTIC DIVA’S DISASTERS™— November 26, 2007 #
I would like to see a continuation of the topic
Comment by Maximus— December 20, 2007 #
Very clever. Seems easy enough….
Comment by Custom Pins— February 17, 2008 #
absolutely FABULOUS..I will use it on chemo caps that my church friends and I are making..will use a pin backing so it can be removed and worn as a pin for blouse/coat/handbag. THANK YOU for this tutorial..great job !!!
Comment by Ann— May 6, 2008 #
Very cute and clever!
Comment by Tracy— July 29, 2008 #
[…] flor dá um pouquinho mais de trabalho, mas o acabamento é perfeito. O tutorial é maravilhoso! Os méritos são do Polar Cat. Fonte: Craft […]
Pingback by As flores de tecido não morrem… «— November 14, 2008 #
gostaria de receber sempre informativos
amei cada foto e cada flor!
parabéns
Comment by cristina— February 14, 2009 #
Great 🙂
I try make it by myself
Comment by Luba— April 12, 2009 #
é perfeitooo
amei…………vcs estão de parabéns
me ajudaram bastante…..queria uma coisa diferente e encontrei..rsrs
muito bigadoO…
adoro vcs,,,,,
bjOs..fiquem com Deus
Comment by elisama— May 14, 2009 #
That’s beautiful! A lovely tutorial, well done!
Comment by julie— May 26, 2009 #
this is fabulous….thank you sooo much for sharing..it’s very generous of you..I guess I’ll try one now..happy crafting
Comment by phiphi— August 14, 2009 #
I just made one and it came out great! Not quite as nice as yours but after a few more I think I’ll have it down.
Comment by Lapel Pins— September 21, 2009 #
Thank You very much for your beautiful tutorial!!!
Regards,
Carine
Comment by Carine— November 19, 2009 #
¡Estupendo! La flor me ha encantado!
Comment by Christianne— April 14, 2010 #
Maravillosas las flores!!!
Congratulations!!!
Comment by Genny— April 23, 2010 #
I love this!
I featured this idea on my blog today, highlighting 3 dozen flower tutorials. Here is the link:
http://oopsey-daisy.blogspot.com/2010/04/wednesdays-wowzers-3-dozen-flower.html
THANKS!!
Comment by Alison— April 29, 2010 #
Very nice job on the tutorial. I followed it to a T and mine didn’t come out half bad. With a little bit more practice I’ll be a craftsman in no time.
Comment by Lapel Pins— July 14, 2010 #
This was relatively painless and easy to follow along. Good job on the guidelines. Practice makes perfect.
Comment by AirCharter— July 16, 2010 #
This worked very well for me. I went to my local crafts store and purchased all the material outlined and followed step by step. Mine didn’t come out as nice as yours but I managed to do a nice job overall.
Comment by Wristbands— July 16, 2010 #
Very creative. My wife loves craft tutorials and making beautiful objects from scrap material. Nice job.
Comment by Baseball Trading Pins— September 2, 2010 #
Olá,lindo lindo mesmo,vou fazer,gostaria de saber quando vc junta as petalas vc costura ou cola,vejo pela foto muito perfeito.
Muito obrigado por nós apresentar uma coisa tão bela.
Ficarei sempre alerta para suas novidades.
Se voce tiver algun broche jeans com tuli manda p mim!
Um abraço
Malu- Santos
Comment by Malu Oliveira— November 21, 2010 #
Que flor linda! Um pouquinho difícil, mas acho que chego lá …. Parabéns e obg.!
Comment by Raquel— June 4, 2011 #
[…] Tissue Paper Pom-Poms How-To – Martha Stewart Crafts , Fabric flower tutorial @ Crafty Beats Polarcat’sFlower Tutorial,cupcake stand on HWTM made by Jessica at Modern Moments Designs , cocktail party design from Rifle […]
Pingback by {Inspiration…DIY} « MY Styled Affair— June 16, 2011 #
The flower looks so cute!!!!!!! cud u plz explain how to join the circles in detail after drawing the triangle???? I’m clueless …sorry i’m beginner 🙂
Comment by Anitha— July 28, 2011 #
Crochet Lacy Petals Potholder – tutprial forever 🙂 https://picasaweb.google.com/100327483329399439438/DropBox?authkey=Gv1sRgCICl9Jr1trrY-AE&pli=1&gsessionid=tqgHOQ1BY8u1YS3GFnvlqw#5675914052922924370
Comment by bezinka— November 17, 2011 #
There’s certainly a lot to know about this issue. I love all of the points you made.
Comment by Muriel— May 3, 2013 #
ADOREI O MODELO DESTA FLOR, OBRIGADA POR DIVIDIR COM TODOS. QUE DEUS TE ILUMINE SEMPRE. BEIJOS NISA 4/07/13 H 15:45
Comment by Nisa Ap. F. da Fonseca— July 4, 2013 #
Reblogged this on gottagetagift and commented:
I often see projects for crochet flowers which can be used to accent many items. However I haven’t been seeing many patterns for fabric flowers. I used to have a pattern I used for brooches but I like this one even more! Maybe someone else can also appreciate it.
Comment by cattycay— January 21, 2015 #
Hey – great blog, just looking around some blogs, seems a really nice platform you are using. I’m currently using WordPress for a few of my blogs but looking to change one of them over to a platform similar to yours as a trial run. Anything in particular you would recommend about it…..
Comment by Ever Lighten— April 17, 2021 #